ODROID
Install Home Assistant Operating System
Follow this guide if you want to get started with Home Assistant easily or if you have little to no Linux experience.
Suggested hardware
We will need a few things to get started with installing Home Assistant. The links below lead to Ameridroid. If you’re not in the US, you should be able to find these items in web stores in your country.
To get started, we suggest the ODROID N2+, the board that powers our Home Assistant Blue, or the ODROID M1.
If unavailable, we also recommend the ODROID C4.
Home Assistant bundles (US market):
The bundles come with Home Assistant pre-installed.
- ODROID N2+: 2 GB RAM / 16 GB eMMC
- ODROID N2+: 4 GB RAM / 64 GB eMMC
- ODROID M1: 4 GB RAM / 256 GB NVMe / 16 GB µSD or 16 GB eMMC
- ODROID M1: 8 GB RAM / 256 GB NVMe / 16 GB µSD or 16 GB eMMC
- ODROID M1: 8 GB RAM / 1 TB NVMe / 64 GB eMMC
- ODROID XU4: 2 GB RAM / 32 GB µSD or 16 GB eMMC
Variants without pre-installed Home Assistant:
These are affiliated links. We get commissions for purchases made through links in this post.
Write the image to your boot medium
-
Attach the Home Assistant boot medium (eMMC module or SD card) to your computer.
If you are using ODROID M1, note that booting from NVMe is not supported. If you want to boot from eMMC, update the firmware before installing the image.
If you are using a Home Assistant Blue or ODROID N2+, you can attach your device directly.
-
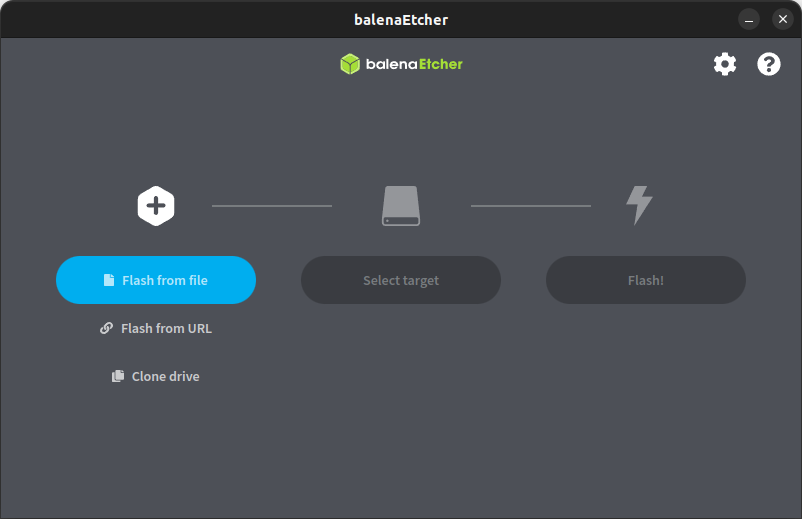
Download and start Balena Etcher. You may need to run it with administrator privileges on Windows.
-
Download the image to your computer.
- Copy the URL for the image.
- If there are multiple links below, make sure to select the correct link for your version of ODROID.
https://github.com/home-assistant/operating-system/releases/download/10.5/haos_odroid-n2-10.5.img.xz
https://github.com/home-assistant/operating-system/releases/download/10.5/haos_odroid-n2-10.5.img.xz
https://github.com/home-assistant/operating-system/releases/download/10.5/haos_odroid-c2-10.5.img.xz
https://github.com/home-assistant/operating-system/releases/download/10.5/haos_odroid-c4-10.5.img.xz
https://github.com/home-assistant/operating-system/releases/download/10.5/haos_odroid-m1-10.5.img.xz
Select and copy the URL or use the “copy” button that appear when you hover it.
- Paste the URL into your browser to start the download.
- Select Flash from file and select the image you just downloaded.
- Flash from URL does not work on some systems.
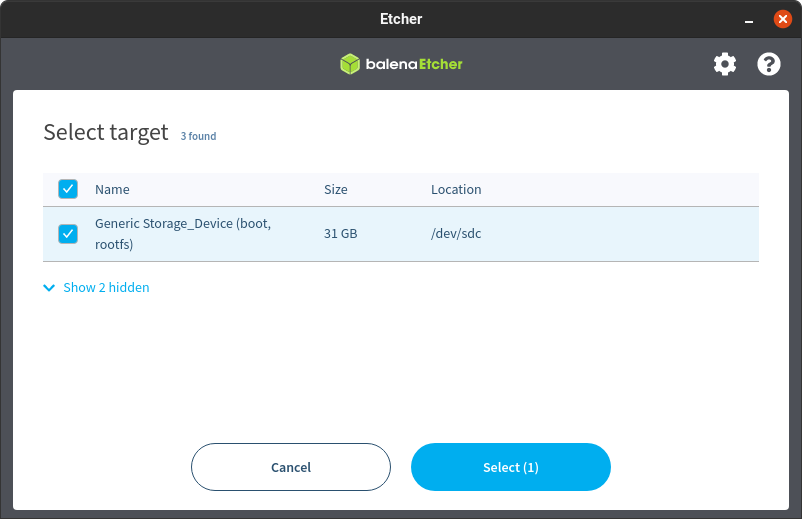
 6. Select target.
 7. Select the boot medium (eMMC module or SD card) you want to use for your installation.
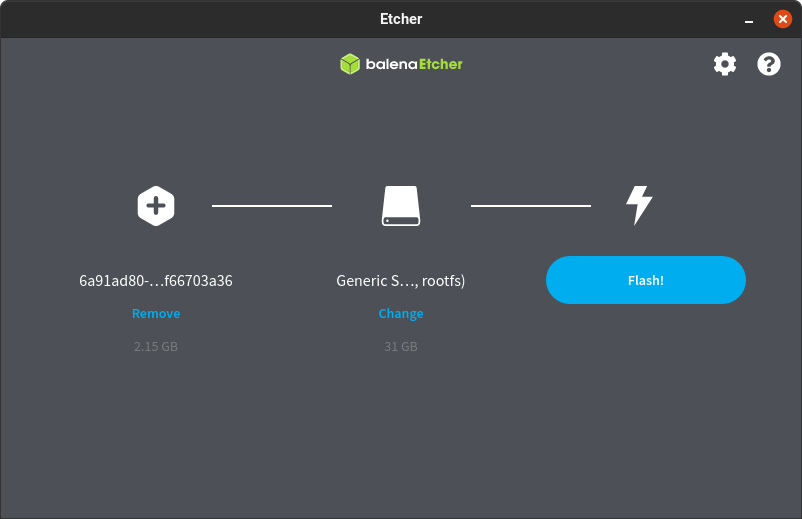
 8. Select Flash! to start writing the image.
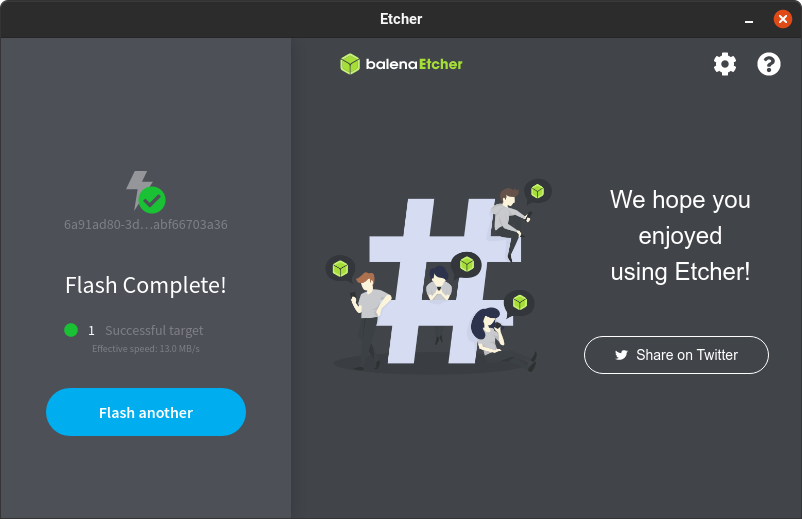
 9. When Balena Etcher has finished writing the image, you will see a confirmation.
Start up your ODROID
-
Insert the boot medium (eMMC module or SD card) you just created.
-
Plug in an Ethernet cable that is connected to the network and power the system on.
-
In the browser of your desktop system, within a few minutes you will be able to reach your new Home Assistant at homeassistant.local:8123.
Help us improve Home Assistant
Have you just installed Home Assistant? The Home Assistant team is looking to talk to you to understand how the installation went.With the Home Assistant Operating System installed and accessible, you can continue with onboarding.
Onboarding
Install Home Assistant Container
These below instructions are for an installation of Home Assistant Container running in your own container environment, which you manage yourself. Any OCI compatible runtime can be used, however this guide will focus on installing it with Docker.
This guide assumes that you already have an operating system setup and a container runtime installed (like Docker).
If you are using Docker then you need to be on at least version 19.03.9, ideally an even higher version, and libseccomp 2.4.2 or newer.
Platform installation
Installation with Docker is straightforward. Adjust the following command so that:
-
/PATH_TO_YOUR_CONFIGpoints at the folder where you want to store your configuration and run it. Make sure that you keep the:/configpart. -
MY_TIME_ZONEis a tz database name, likeTZ=America/Los_Angeles.docker run -d \ --name homeassistant \ --privileged \ --restart=unless-stopped \ -e TZ=MY_TIME_ZONE \ -v /PATH_TO_YOUR_CONFIG:/config \ --network=host \ ghcr.io/home-assistant/home-assistant:stable# if this returns "Image is up to date" then you can stop here docker pull ghcr.io/home-assistant/home-assistant:stable# stop the running container docker stop homeassistant# remove it from Docker's list of containers docker rm homeassistant# finally, start a new one docker run -d \ --name homeassistant \ --restart=unless-stopped \ --privileged \ -e TZ=MY_TIME_ZONE \ -v /PATH_TO_YOUR_CONFIG:/config \ --network=host \ ghcr.io/home-assistant/home-assistant:stableOnce the Home Assistant Container is running Home Assistant should be accessible using
http://<host>:8123(replacewith the hostname or IP of the system). You can continue with onboarding. Onboarding
Restart Home Assistant
If you change the configuration, you have to restart the server. To do that you have 3 options.
- In your Home Assistant UI, go to the Settings > System and click the Restart button.
- You can go to the Developer Tools > Services, select the service
homeassistant.restartand select Call Service. - Restart it from a terminal.
docker restart homeassistantdocker compose restartDocker compose
docker composeshould already be installed on your system. If not, you can manually install it.As the Docker command becomes more complex, switching to
docker composecan be preferable and support automatically restarting on failure or system restart. Create acompose.ymlfile:version: '3' services: homeassistant: container_name: homeassistant image: "ghcr.io/home-assistant/home-assistant:stable" volumes: - /PATH_TO_YOUR_CONFIG:/config - /etc/localtime:/etc/localtime:ro restart: unless-stopped privileged: true network_mode: hostStart it by running:
docker compose up -dOnce the Home Assistant Container is running, Home Assistant should be accessible using
http://<host>:8123(replacewith the hostname or IP of the system). You can continue with onboarding. Onboarding
Exposing devices
In order to use Zigbee or other integrations that require access to devices, you need to map the appropriate device into the container. Ensure the user that is running the container has the correct privileges to access the
/dev/tty*file, then add the device mapping to your container instructions:docker run ... --device /dev/ttyUSB0:/dev/ttyUSB0 ...version: '3' services: homeassistant: ... devices: - /dev/ttyUSB0:/dev/ttyUSB0Optimizations
The Home Assistant Container is using an alternative memory allocation library jemalloc for better memory management and Python runtime speedup.
As jemalloc can cause issues on certain hardware, it can be disabled by passing the environment variable
DISABLE_JEMALLOCwith any value, for example:docker run ... -e "DISABLE_JEMALLOC=true" ...version: '3' services: homeassistant: ... environment: - DISABLE_JEMALLOC: trueThe error message
<jemalloc>: Unsupported system page sizeis one known indicator.Install Home Assistant Core
This is an advanced installation process, and some steps might differ on your system. Considering the nature of this installation type, we assume you can handle subtle differences between this document and the system configuration you are using. When in doubt, please consider one of the other installation methods, as they might be a better fit instead.
PrerequisitesThis guide assumes that you already have an operating system setup and have installed Python 3.11 (including the package
python3-dev) or newer.Install dependencies
Before you start, make sure your system is fully updated, all packages in this guide are installed with
apt, if your OS does not have that, look for alternatives.sudo apt-get update sudo apt-get upgrade -yInstall the dependencies:
sudo apt-get install -y python3 python3-dev python3-venv python3-pip bluez libffi-dev libssl-dev libjpeg-dev zlib1g-dev autoconf build-essential libopenjp2-7 libtiff5 libturbojpeg0-dev tzdata ffmpeg liblapack3 liblapack-dev libatlas-base-devThe above-listed dependencies might differ or missing, depending on your system or personal use of Home Assistant.
Create an account
Add an account for Home Assistant Core called
homeassistant. Since this account is only for running Home Assistant Core the extra arguments of-rmis added to create a system account and create a home directory. The arguments-G dialout,gpio,i2cadds the user to thedialout,gpioand thei2cgroup. The first is required for using Z-Wave and Zigbee controllers, while the second is required to communicate with GPIO.sudo useradd -rm homeassistant -G dialout,gpio,i2cCreate the virtual environment
First we will create a directory for the installation of Home Assistant Core and change the owner to the
homeassistantaccount.sudo mkdir /srv/homeassistant sudo chown homeassistant:homeassistant /srv/homeassistantNext up is to create and change to a virtual environment for Home Assistant Core. This will be done as the
homeassistantaccount.sudo -u homeassistant -H -s cd /srv/homeassistant python3 -m venv . source bin/activateOnce you have activated the virtual environment (notice the prompt change to
(homeassistant) homeassistant@raspberrypi:/srv/homeassistant $) you will need to run the following command to install a required Python package.python3 -m pip install wheelOnce you have installed the required Python package, it is now time to install Home Assistant Core!
pip3 install homeassistant==2023.10.1Start Home Assistant Core for the first time. This will complete the installation for you, automatically creating the
.homeassistantconfiguration directory in the/home/homeassistantdirectory, and installing any basic dependencies.hassYou can now reach your installation via the web interface on
http://homeassistant.local:8123.If this address doesn’t work you may also try
http://localhost:8123orhttp://X.X.X.X:8123(replace X.X.X.X with your machines’ IP address).When you run the
hasscommand for the first time, it will download, install and cache the necessary libraries/dependencies. This procedure may take anywhere between 5 to 10 minutes. During that time, you may get a site cannot be reached error when accessing the web interface. This will only happen the first time. Subsequent restarts will be much faster.We get commissions for purchases made through links in this post.
Help us to improve our documentation
Suggest an edit to this page, or provide/view feedback for this page.